Friday, April 11

Jämälankasiili suomeksi - The Hedgehog in Finnish


Tässäpä jämälankasiilin ohje, pyynnöstä, myös suomeksi:

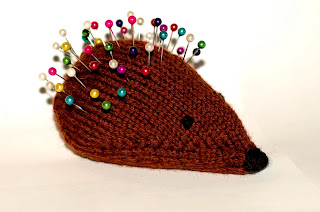
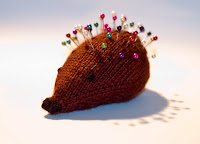
Jämälankasiili

Tarvitset hiukan lankaa, vaikkapa ruskeaa, muukin käy ja samalla ohjeellahan saisi vaikka harmaan hiiren, jos jatkaisi vielä lopuilla silmukoilla häntää. Itse käytin Gjestalin Maija-sukkalankaa, jota meni reilusti alle puoli kerää (1 kerä = 50g). Maijan speksit 85% villa, 15% polyamidi, 50g=c.130m. Ainakin tähän lankaan kävivät sukkapuikot kokoa 3mm.

Luo 12s, jaa ne kolmelle puikolle 3-3-6. Puikot ovat #1, #2 ja #3, puikolla #3 tehdään siilin mahapuolta. Työtä neulotaan kuin sukkaa, "putkilona".

Krs 2: 1o, neulo seuraava silmukka etu- ja takareunastaan oikein, neulo oikein kunnes puikolla #2 on jäljellä 2s, neulo seuraava silmukka etu- ja takareunastaan oikein, neulo oikein krs:n loppuun

Krs 3: neulo oikein

Krs 4: 1o, neulo seuraava s etu- ja takareunastaan oikein, neulo kunnes puikolla #2 jäljellä 2s, neulo seuraava s etu- ja takareunastaan oikein, 1o, neulo puikon #3 ensimmäinen s etu- ja takareunastaan oikein, neulo kunnes puikolla #3 on jäljellä 1s, neulo tämä silmukka etu- ja takareunastaan oikein

Krs 5: neulo oikein

Toista kerroksia 2-5 kunnes puikolla #3 on 16s, toista sitten vielä tarpeen mukaan kerroksia 2-3 kunnes kaikilla puikoilla on 16s.

Neulo 2cm sileää.

Aloita kavennukset:

Krs 1: *6o, 2 oikein yhteen*
Krs 2: neulo oikein
Krs 3: *5o, 2 oikein yhteen*
Krs 4: neulo oikein
Krs 5: *4o, 2 oikein yhteen*
Krs 6: neulo oikein
Krs 7: *3o, 2 oikein yhteen*
Krs 8: neulo oikein

Kun kaikilla puikoilla on 8s, ompele siilille nenä ja silmät siihen päähän, mistä aloitit työn. Sulje aukko samalla kun ompelet nenän. Itse käytin mustaa lankaa, joka oli suunnilleen työlankaa vastaavaa paksuutta ja materiaalia. Tässä vaiheessa voit päätellä kaikki muut langanpäät paitsi tietysti työskentelylangan. Voit myös täyttää siilin nyt - itse käytin jämälankapätkiä, mutta vanukin käy.

Jatka työskentelyä ja lisää täytettä tarvittaessa:

Krs 9: *2o, 2 oikein yhteen*
Krs 10: *1o, 2 oikein yhteen*

Katkaise lanka, pujottele se jäljellä olevista silmukoista, kiristä ja päättele. Lisää nuppineulat piikeiksi, ja siili on valmis!
Friday, April 4

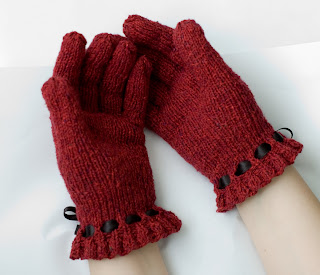
Anitta gloves

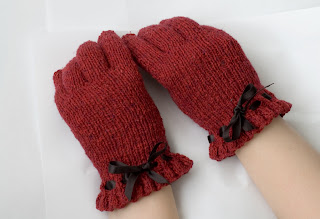
Here's the pair of gloves I mentioned. I was inspired by vintage fashion. I wanted to knit a pair of gloves but didn't find a suitable pattern (at least for free), so I made one up. Feel free to knit these for non-profitable purposes ;)


Anitta gloves

Yarn: Garnstudio Silke-Tweed (52% silk, 48% wool) 50g=200m, 1 skein
Gauge: 23sts and 30 rounds = 10x10cm
Needles: 3mm dpns
1 meter black satin ribbon, width 5mm

Right hand:

CO 108 sts. Divide on 3 (or 4, if you wish) dpns.
Rounds 1-3: *k3, p3*
Round 4: *S2KP, p3tog* (36 sts remain)
Rounds 5-7: *k1, p1*
Round 8: *yo, ssk*
Knit in stockinette for 2,5-3cm / one inch.

Thumb gusset (in the increases, take the bar between the stitches on the needle and knit it through back loop):
Round 1: inc tbl, k6, inc tbl, knit to end
Rounds 2-4: knit
Round 5: inc tbl, k8, inc tbl, knit to end
Rounds 6-8: knit
Round 9: inc tbl, k10, inc tbl, knit to end
Rounds 10-12: knit
Slip first 12 sts on waste yarn (these will be used for the thumb). CO 6, continue to work in the round for 3cm / 1-1½ inch(es).

Fingers:
Divide the sts evenly on 2 needles. The needle with the thumb gusset will be needle # 1.

Little finger: k14 from needle #1, knit next 8 sts (for little finger), CO 4 sts, work with these 12 sts in the round until the tip of finger is reached, then *S2KP* 4 times, pull yarn through remaining sts and tighten

Ring finger: k 4 next sts from needle #2, CO 2 sts, k 4 sts from end of needle #1, pick up and knit 4 sts from the CO edge of little finger, work in the round until the tip of finger is reached, then work S2KP, S2KP, k1, S2KP, S2KP, k1, finish

Middle finger: k 5 next sts from needle #2, CO 2, k5 from end of needle #1, pick up and knit 2 sts from the CO edge of ring finger, then work as the ring finger

Index finger: k the remaining 10 sts from needles #1 and #2, pick up and knit 4 sts from the CO edge of middle finger, then work as ring and middle finger

Thumb: move the sts from waste yarn back onto needles, pick up 6 sts from the CO edge and 1 sts from both "gaps" (between held and picked up sts) = 20 sts. Rejoin yarn, work in the round for 2 rounds, then decrease 1 sts on both sides = 18 sts. Work in the round until the tip of thumb is reached, work *S2KP* 6 times, finish.

Left hand: Work as the right hand, but reverse the position of fingers and thumb gusset.

Finishing: Weave in ends. Cut the satin ribbon (=2 x 0,5m). Thread the ribbons through the holes of the yo round, don't pull the ribbon too tight (try the glove on before finishing). You may secure the ribbon by sewing a few stitches on the bow after you've ensured it isn't too tight.


If there's something wrong with the pattern, please do let me know!

Tuesday, March 11

Waste yarn hedgehog

I thought I'd share a little something with you. If you've got just a bit of brown yarn, this might be the nice way to get rid of it. With grey yarn, why not make a mouse.

Waste Yarn Hedgehog

You’ll need a bit of yarn – in my case, considerably less than half a skein – and a set of 3mm dpns.

I used Gjestal Maija sock yarn, 85% wool, 15% nylon, 50g=c.130m.

And this is how it’s done:


CO 12sts, knit in the round divide the stitches so that there are 3 sts on Needles 1 and 2 (Top side)
and 6 sts on Needle 3 (Bottom side).


Round 2: k1, kfb, k until there are two sts left on Needle 2, kfb, k, knit to end of round

Round 3: knit

Round 4: k1, kfb, k until there are two sts left on Needle 2, kfb, k1, kfb, knit until there is one stitch
left on Needle 3, kfb

Round 5: knit

Repeat Rounds 2-5 until there are 16 sts on Needle 3, then repeat Rounds 2-3 until there are 16 sts on each needle.

Then knit 2cm.

Now you’ll have to decrease:

Round 1: * k6, k2tog *

Round 2: knit

Round 3: * k5, k2tog *

Round 4: knit

Round 5: * k4, k2tog *

Round 6: knit

Round 7: * k3, k2tog *

Round 8: knit

When there are 8 sts on each needle, sew eyes and nose to the other (CO) end of the piece; close the gap while sewing the nose. I used black yarn of approximately same gauge as the main yarn. Weave in ends at this point, except the working yarn, of course.

Also, you may stuff the hedgehog at this point. I used waste yarn (mostly the bits cut off when weaving in ends; that is, leftovers from other ongoing/finished projects) but you can also use polyester fiber.

Continue the decreases and add stuffing if necessary:

Round 9: * k2, k2tog *

Round 10: * k1, k2tog *

Cut yarn, weave through remaining sts, pull tight and fasten. Insert pins, and your little helper is good to go!

Edit: corrected a typing mistake, there should be 3, not 4 sts in the beginning on needles 1 and 2. However, this doesn't really change the outcome, since the increases make it 4 soon after. I just thought it might be too hard for you to CO 12 and then divide them 6-4-4 :D

Thursday, March 6

Finally something

It seems that writing blog entries in two languages takes too much time. Not that it would really. But it just feels like a marathon, writing the same stuff twice. So, I'll try to manage a comeback to the blogging world, using only English for now. At some point I might get bilingual again, partly at least. But this post is just a quick one, mostly to remind myself of the existence of this blog. So that's it.

But wait. I've almost finished a pair of vintagish (if-it's-not-a-word-I'll-make-it-one!) gloves. Quite a nice pair, actually. So I thought I'd share the pattern with you guys. The pattern is basically written already, but I don't have any photos to go with it yet, and I still have to weave in some twenty loose ends... (that's the worst thing about knitting gloves, in my opinion).

Here's a photo of something I made for Christmas (that's our front door):